Flowery foodie goodness.

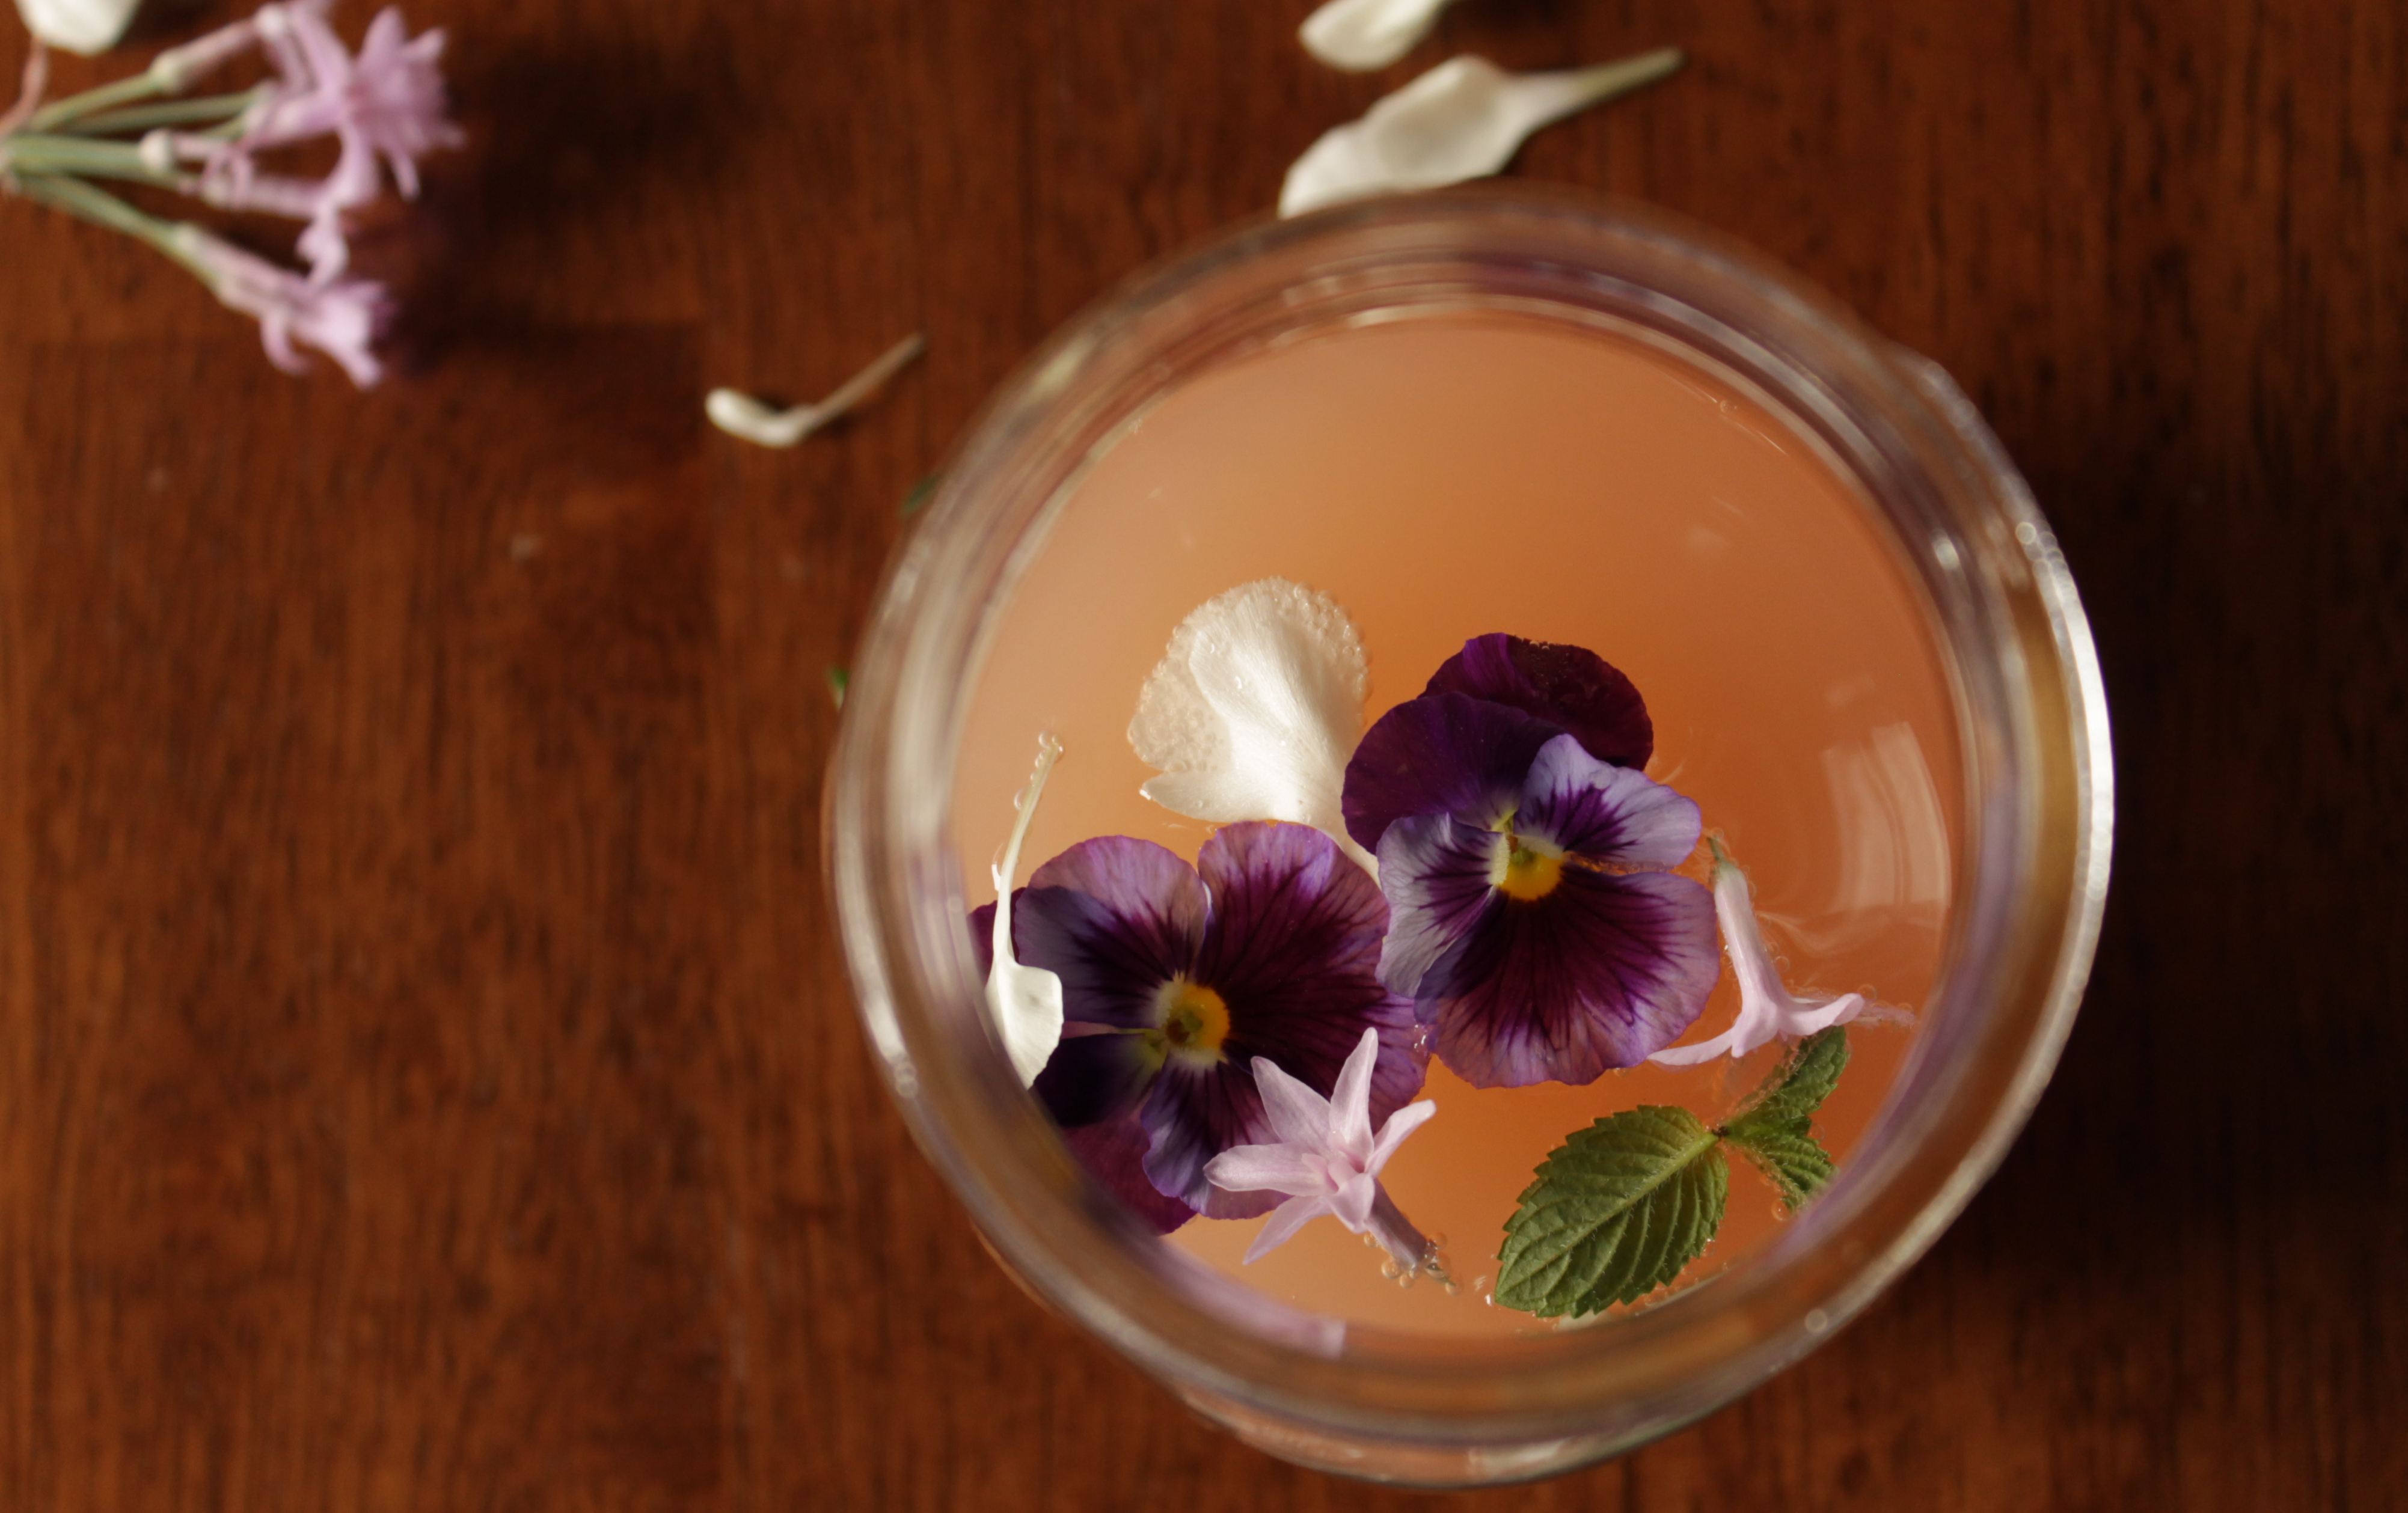
What’s not to love about flowers? They look beautiful lining a pathway, sitting in a jar on the windowsill, or even printed onto fabrics. Another great thing: some flowers are edible! We just love the idea of having a lovely little salad that is dotted with Johnny Jump Ups, or using blackberry blossoms to garnish a cake.

Out of the Thistle Blog, Flowery Foodie GoodnessSo in celebration of some of these delicious florals, we’ve tested a few recipes that have become our favorites.

Out of the Thistle Blog, Flowery Foodie Goodness

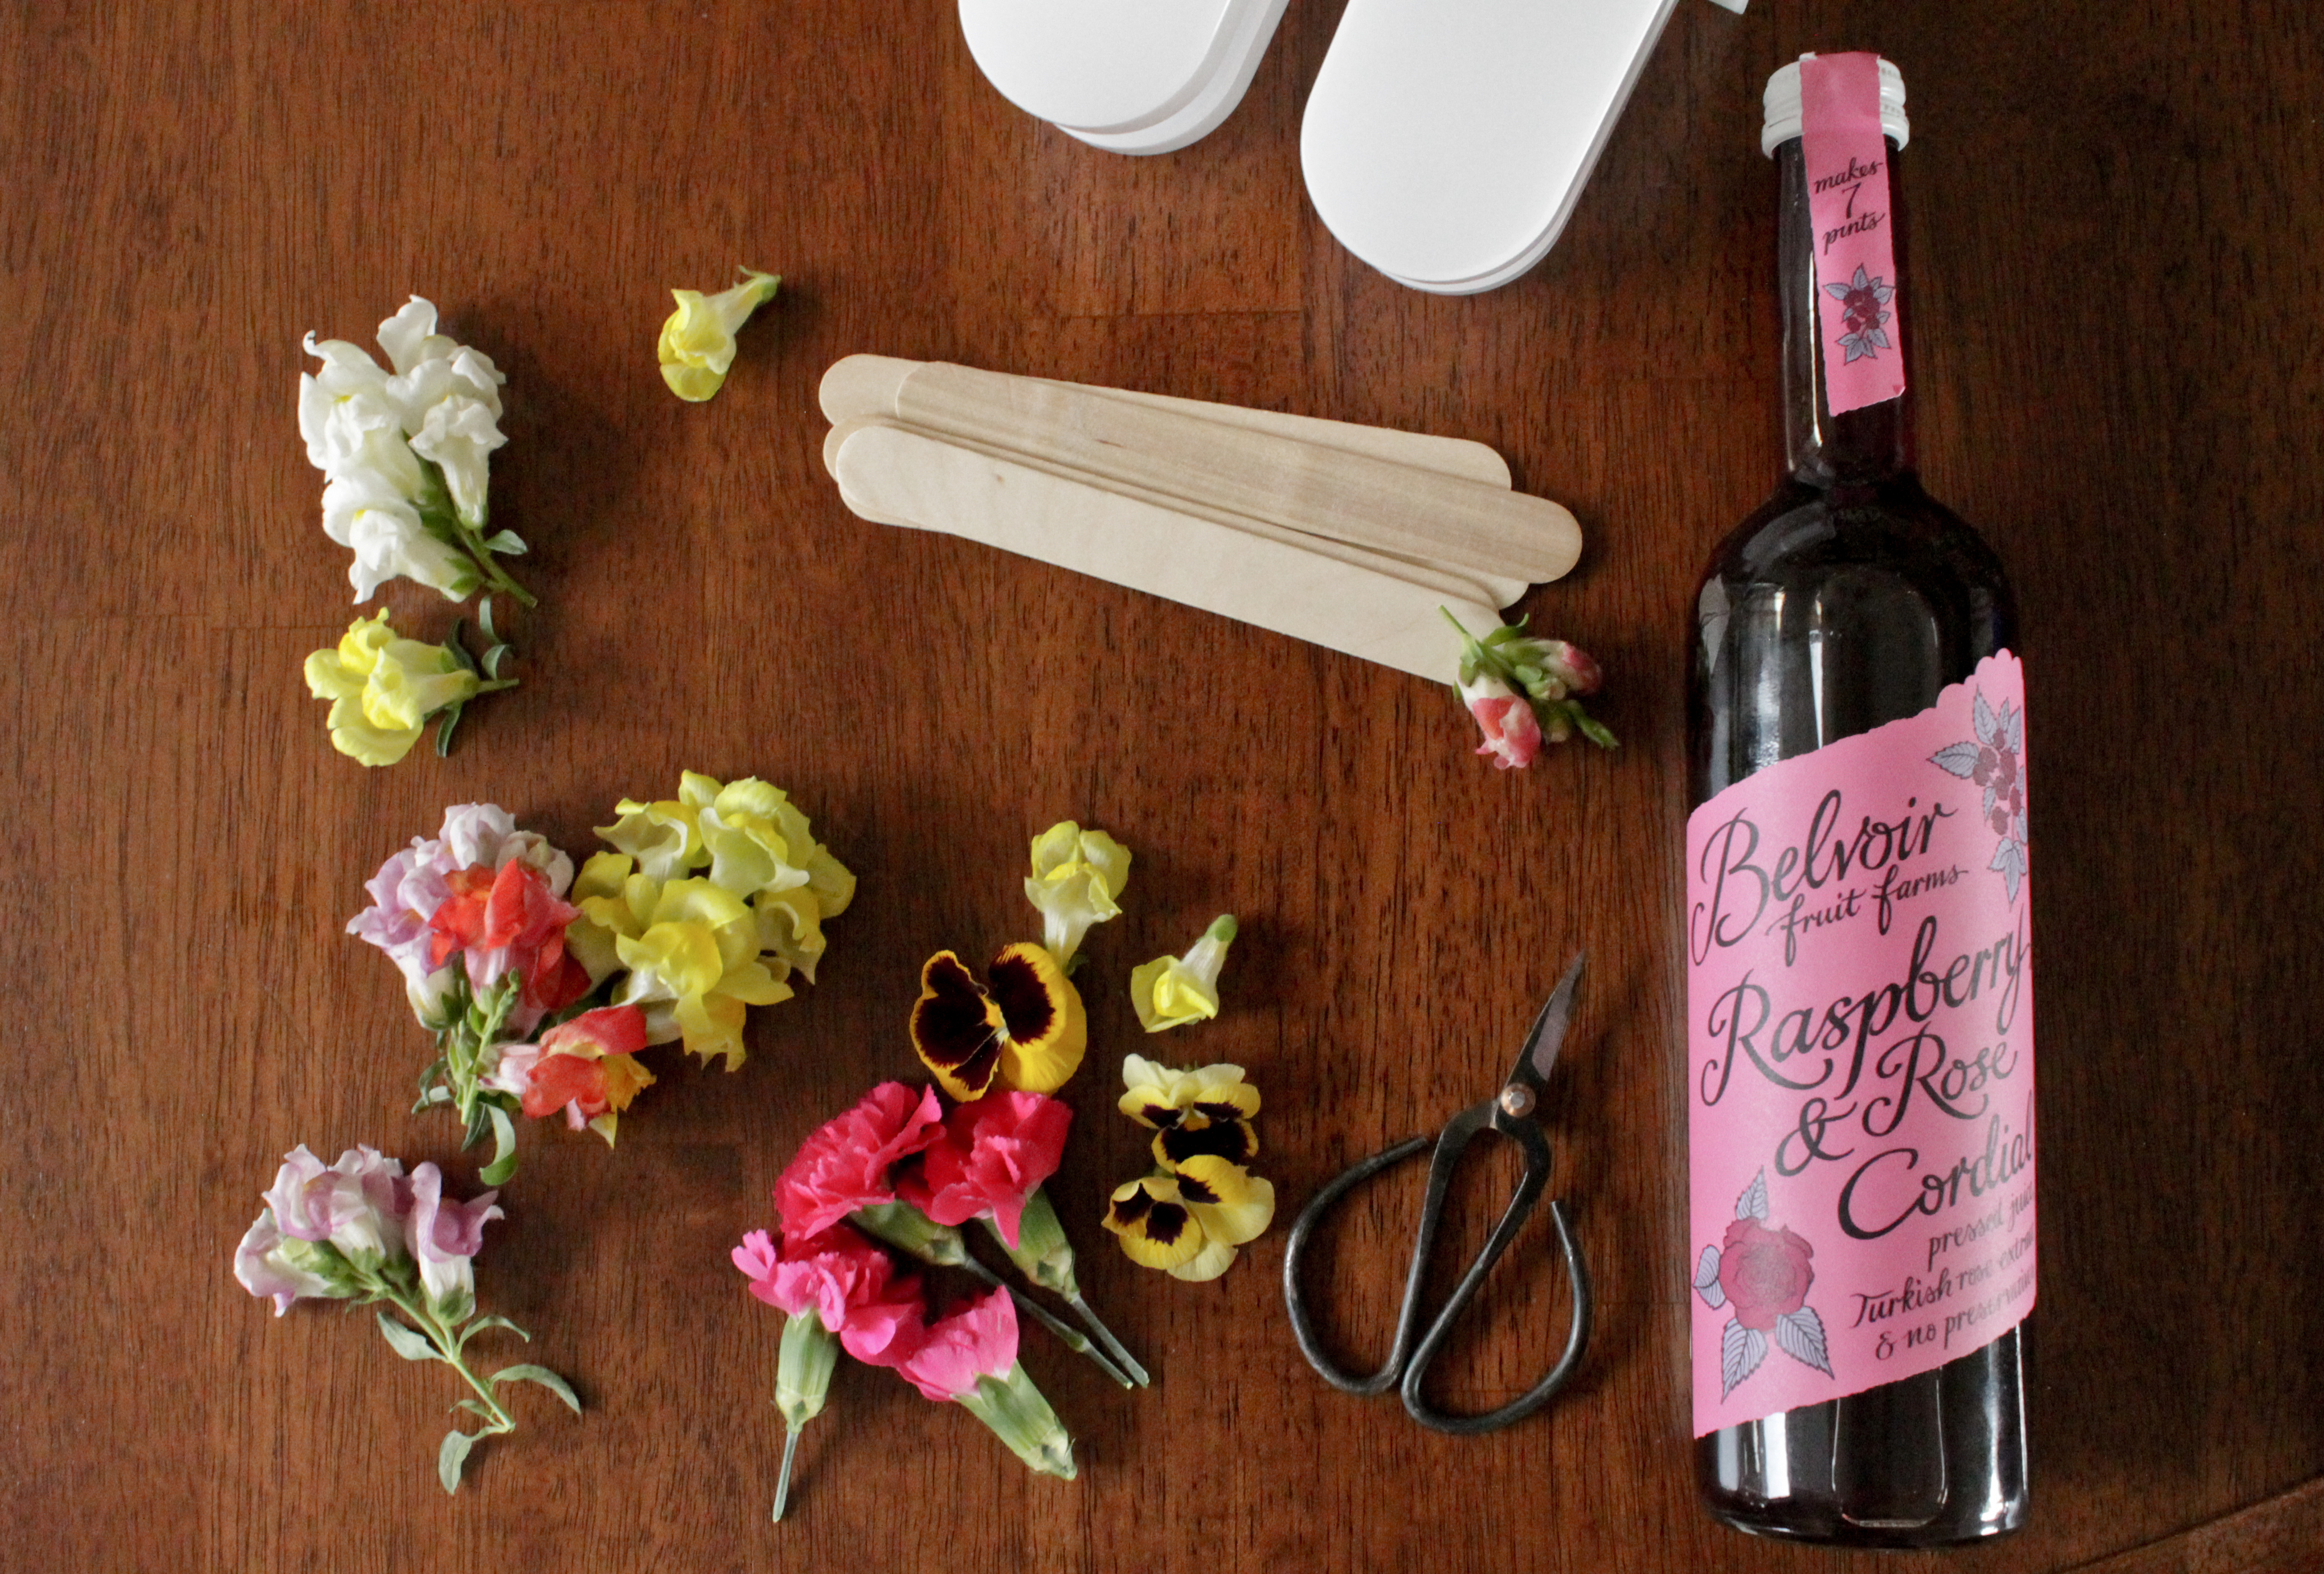
1. Raspberry & Rose flavored Floral Ice Pops
Recipe via Chew Town (Makes 10)

4 cups water
Various edible flowers (petals retained)
1 tablespoon Raspberry and Rose cordial
Popsicle Mold

Place petals inside the popsicle molds being sure to layer them on top of each other and not compact them.

Mix water and cordial in a large jug and stir well to combine.

Gently pour the cordial mixture into the popsicle molds trying not to unseat the petals too much. Insert popsicle sticks and place in the freezer until frozen solid.

To remove from the molds gently place bottom of molds in warm water until the popsicles pull free.

Out of the Thistle Blog, Flowery Foodie Goodness.

These popsicles make the perfect frozen treat for any spring or summer soiree!

Out of the Thistle Blog, Flowery Foodie Goodness


Out of the Thistle Blog, Flowery Foodie Goodness

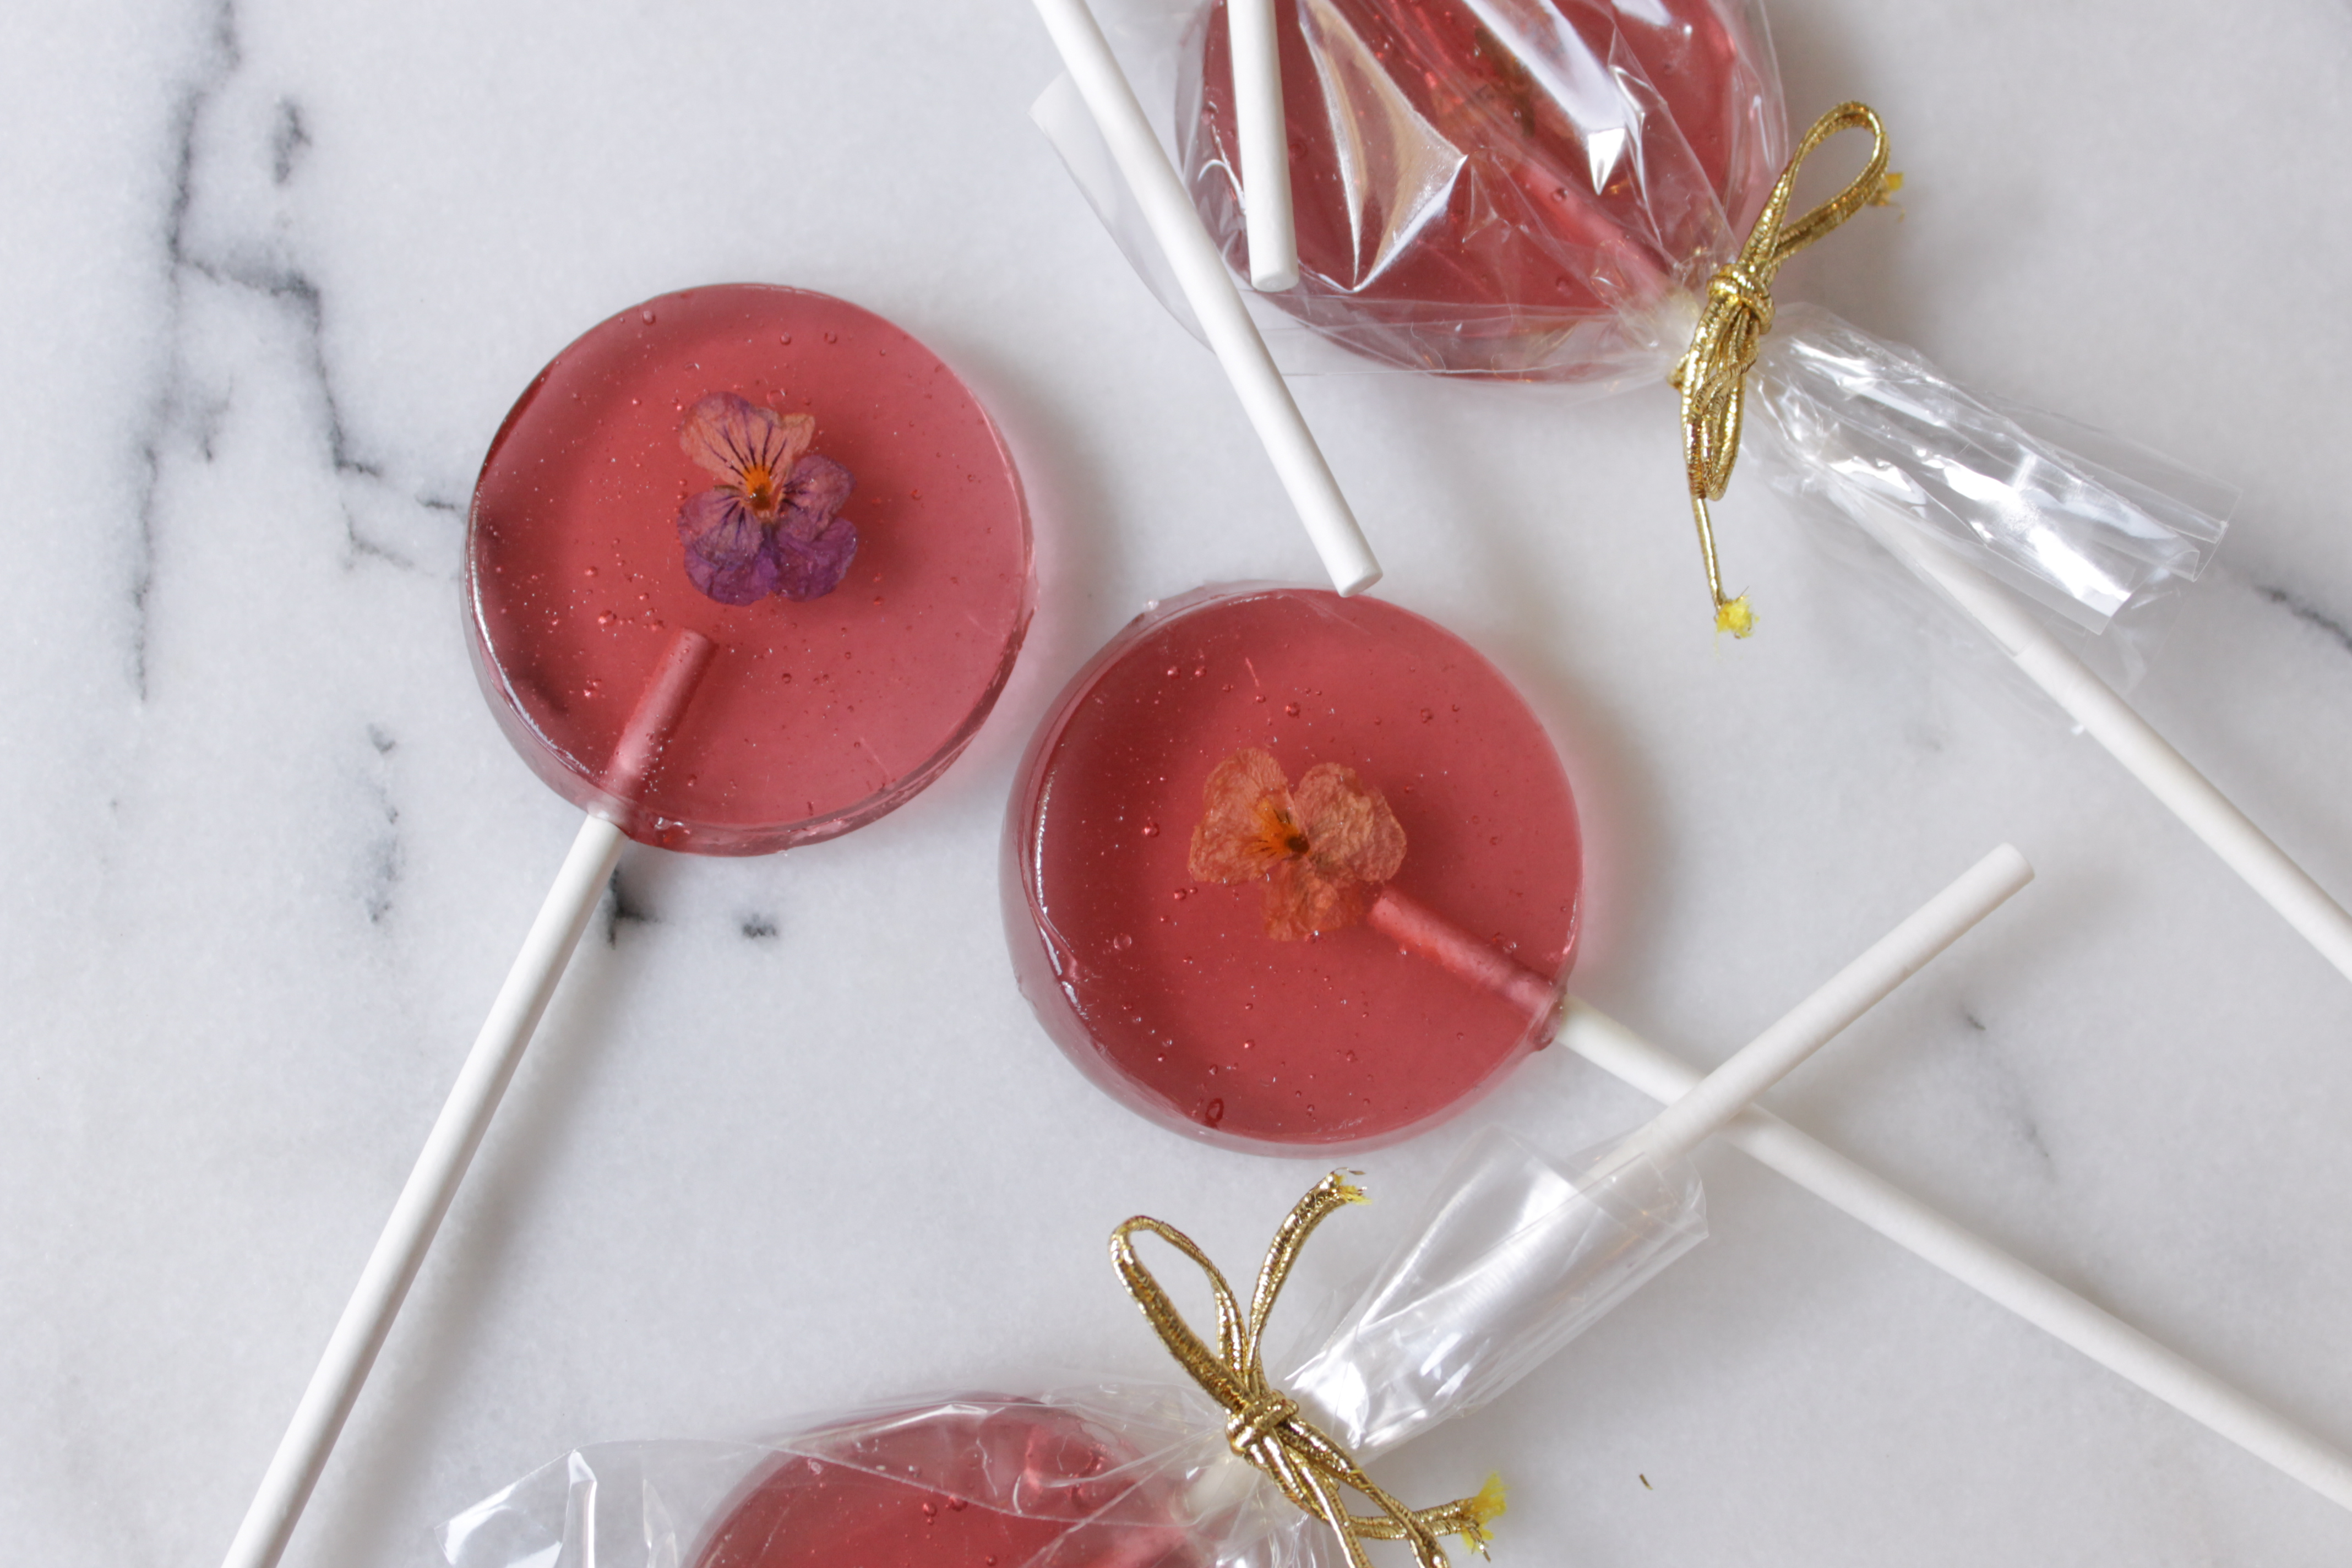
2. Lovely Little Lollies
Recipe via Sprinkle Bakes
Yield: 10 lollipops

2 cups sugar
2/3 cup corn syrup
2/3 cup water
1 dram bottle candy flavoring oil (such as LorAnn, I used Blackberry)
Violet gel food coloring
10 organic whole voila flower heads or pansy petals, washed and patted dry
10 lollipop sticks
    1. If you are using a lollipop mold (recommended), lightly grease it with cooking spray.  If you are not using a mold, pour 2 cups of powdered sugar into a baking pan with a lip.  Create indentations with the bottom of a glass or other flat-bottomed object. Set aside.
    2. Stir together the sugar, corn syrup and water in a small saucepan and clip a candy thermometer to the side of the pan.
    3. Bring the mixture to a boil over high heat.  Continue to heat without stirring until the bubbling mixture reaches the hard-crack stage (302 degrees F). Remove pan from heat.
    4. Stir in flavoring oil and a small amount of gel food coloring. Be extra careful because the mixture will bubble and sputter with these additions.
    5. When the mixture has stopped bubbling, drop it into molds by the spoonfuls (or powdered sugar indentations) using a metal spoon. Carefully place a viola flower head or petal face down on the hot candy. Use the end of a lollipop stick to slightly press it into the candy.  Quickly pour just enough hot candy over the flower head or petal to cover the backside, encasing it completely in the candy.  Place a lollipop stick in the candy and turn 1/2 turn.  Allow the candy to harden, then remove from molds.  If using powdered sugar to mold, you may choose to rinse off the excess sugar under a thin stream of warm water – either way, the flower will become more visible once the lollipop is being enjoyed.

TIP: WORK AS FAST AS YOUR LITTLE HANDS CAN MOVE. The candy mixture cools VERY quickly.


Out of the Thistle Blog, Flowery Foodie Goodness

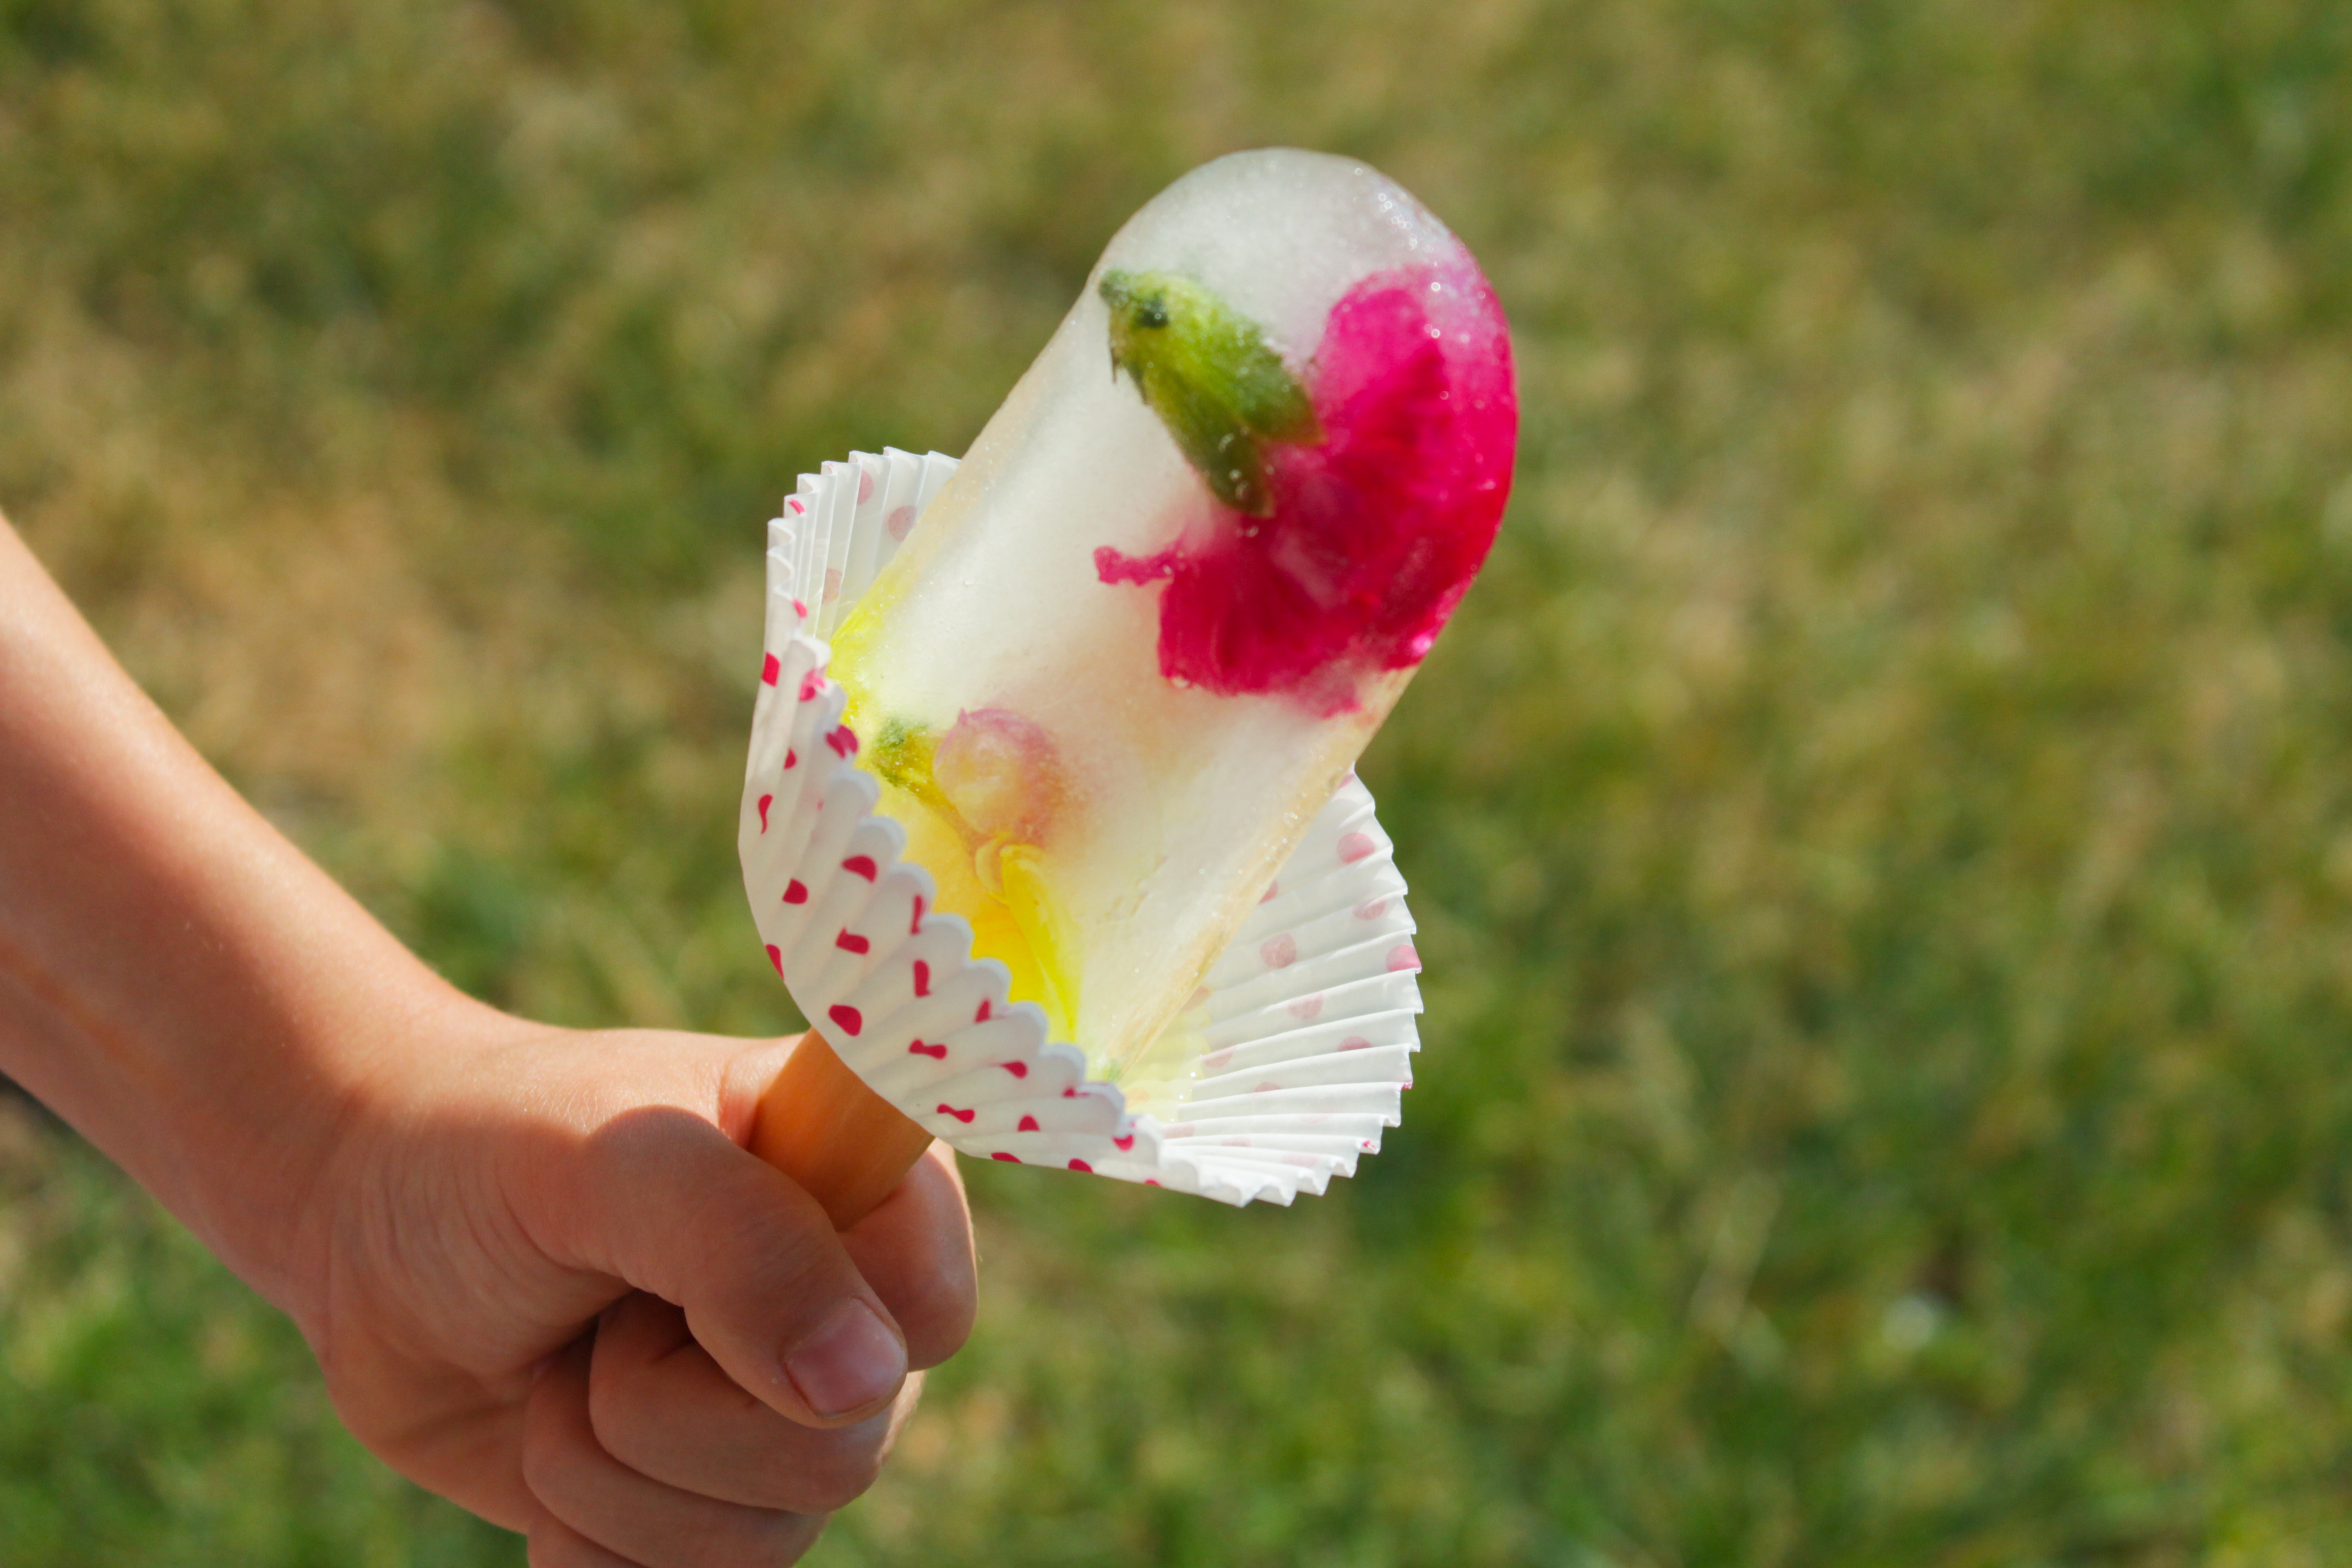
3. Blossoms and Berries Ice Cubes

4 Quarts of Distilled Water
Arrangement of Organic Edible Flowers, Berries, Mint Leaves
Ice Cube Tray

Boil distilled water and allow to cool completely.

Pour water into trays, filling molds halfway. Place flowers, berries, and mint in each cube and place tray in freezer. Once completely frozen, fill each cube with the rest of the cooled, boiled water and continue to freeze completely. Fill up your cups and enjoy!

Out of the Thistle Blog, Flowery Foodie Goodness.

And once your ice melts, you’ll have pretty little blossoms floating around in your beverage.

Out of the Thistle Blog, Flowery Foodie Goodness.


Out of the Thistle Blog, Flowery Foodie Goodness


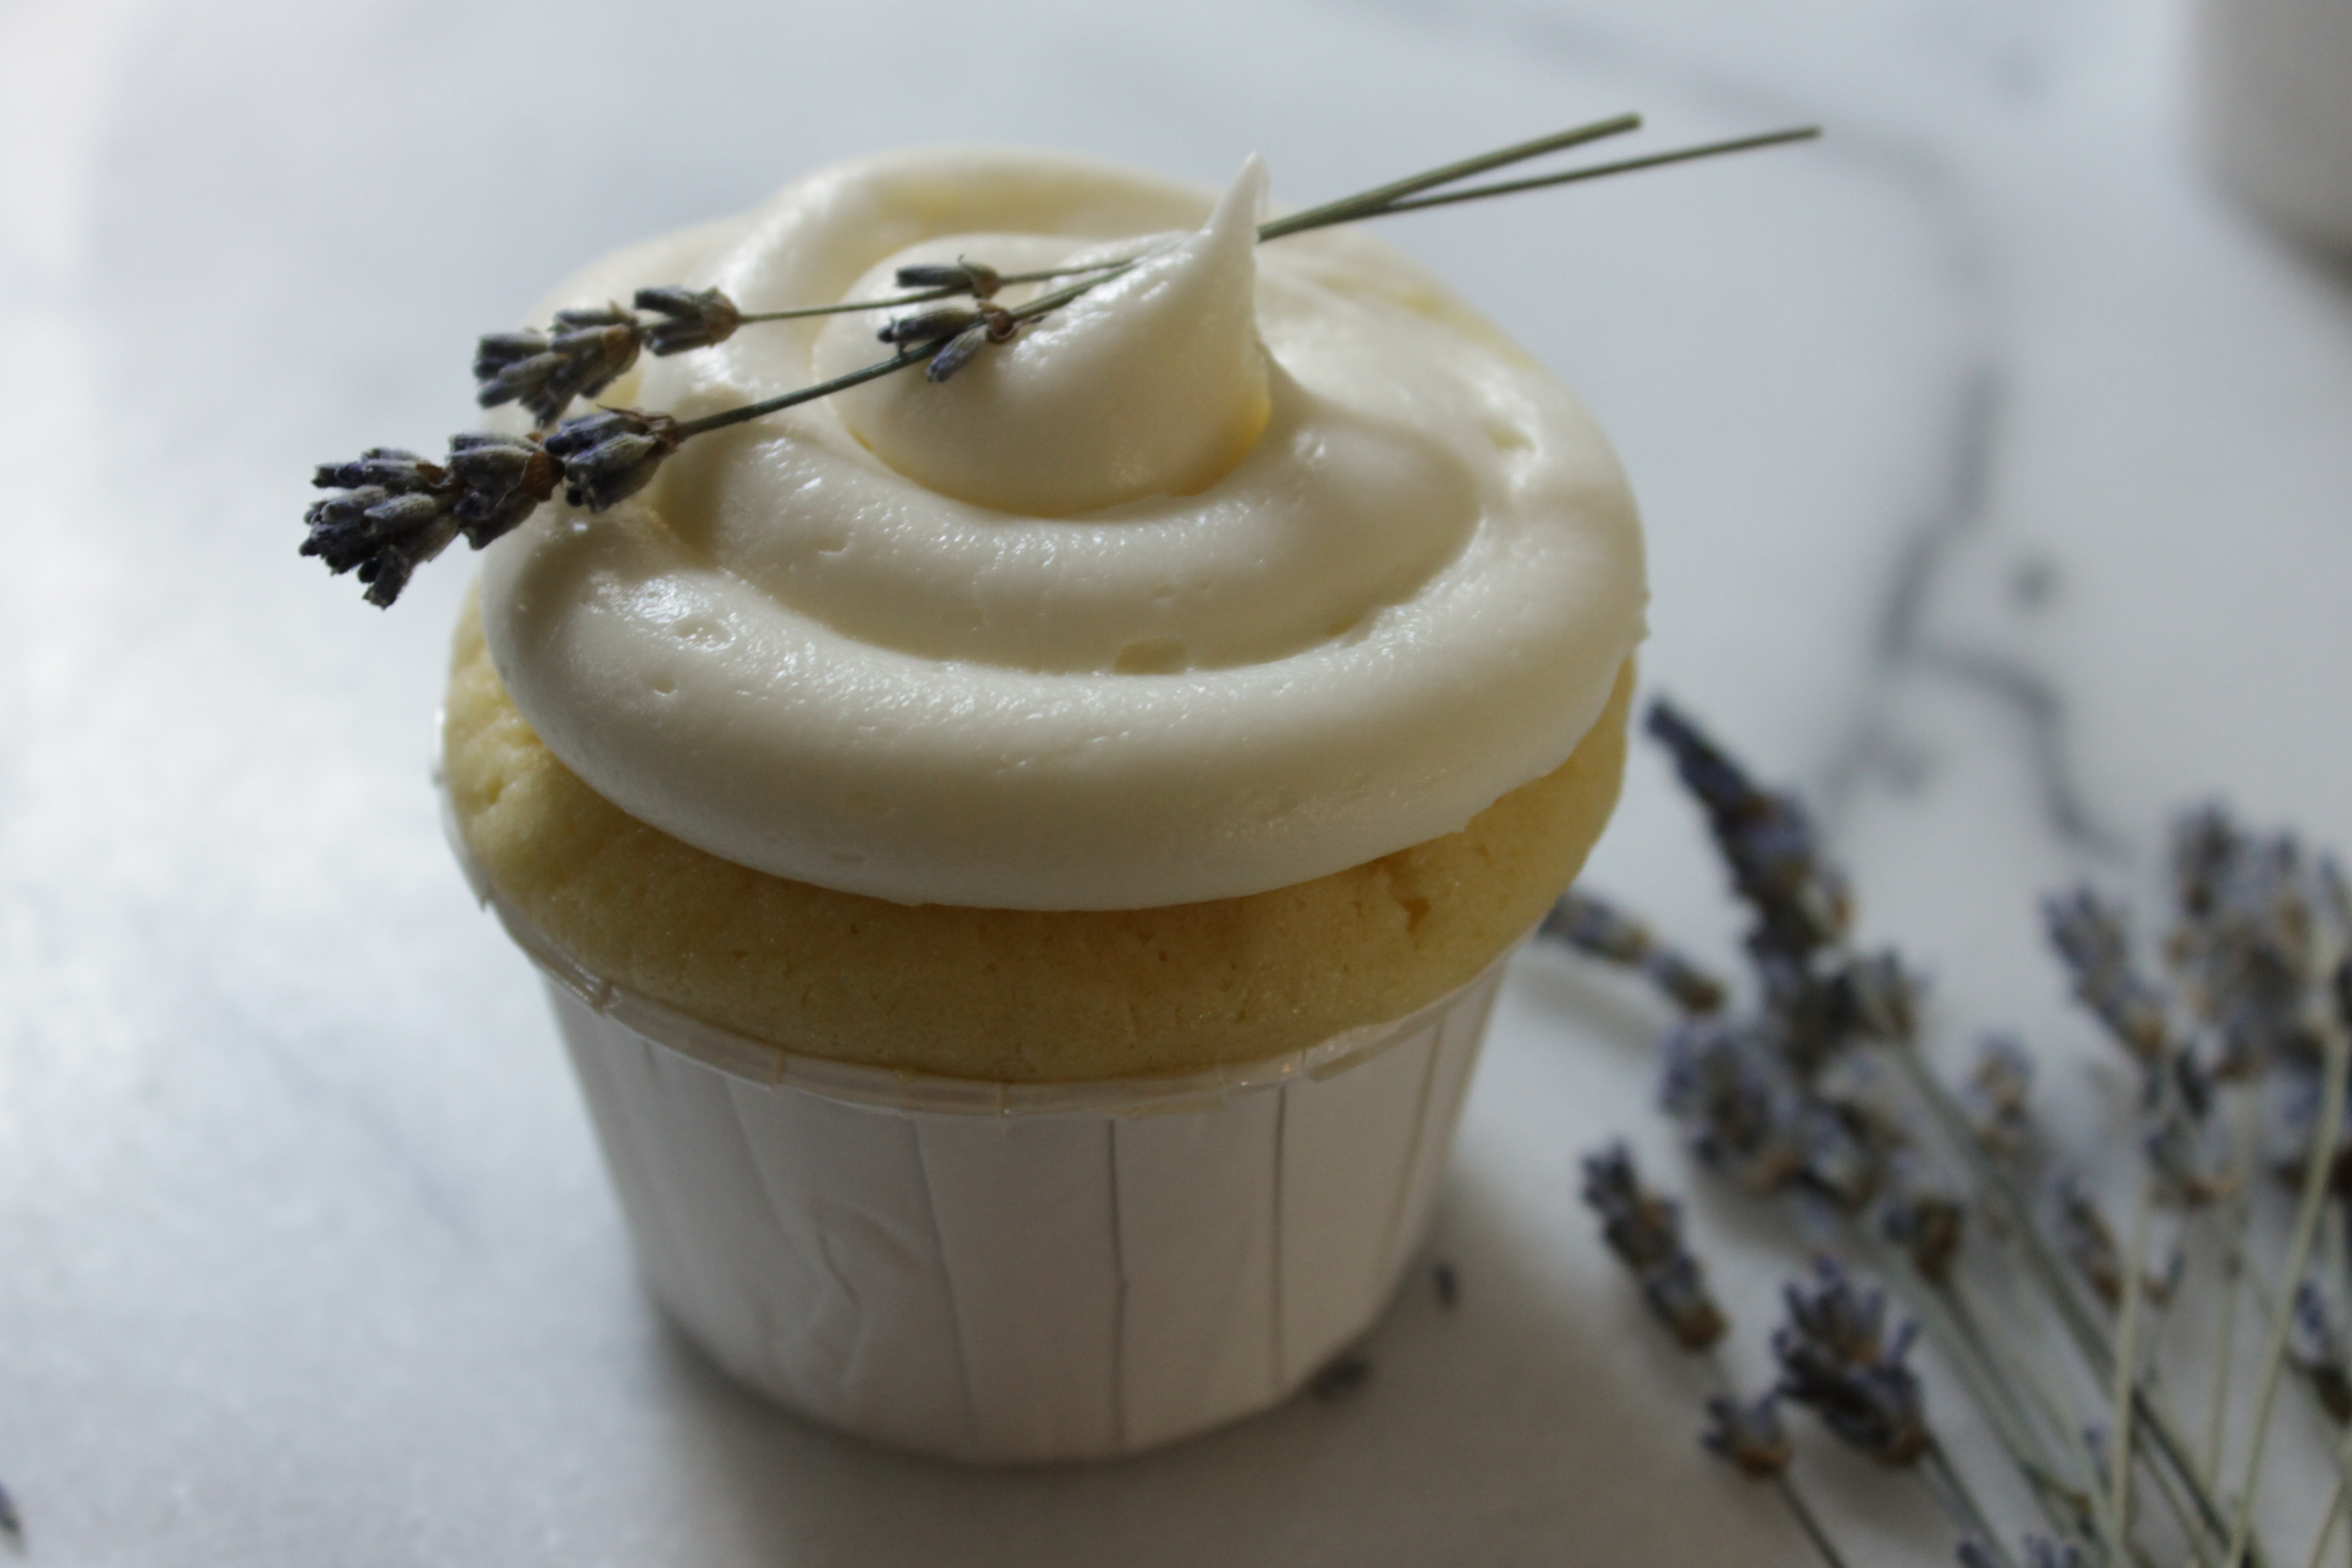
4. Limoncello Lavender Cupcakes
Recipe adapted from here!

Yield: 12-18 Cupcakes

For the cupcakes:
1½ cups all-purpose flour
1 teaspoon baking powder
½ teaspoon salt
½ stick unsalted butter, at room temperature
2 ounces cream cheese, at room temperature
1 cup granulated sugar
3 large eggs
2 tablespoons limoncello
½ cup buttermilk
¼ cup lemon juice
Zest of one lemon
1 tablespoon crushed, dried lavendar (optional)
Dried lavender sprigs for garnish

For the lemon curd:
Zest of 2 lemons
½ cup lemon juice
¼ cup granulated sugar
1 egg + 1 egg yolk

For the limoncello buttercream:
1/2 stick butter
6 oz cream cheese
4 cups powdered sugar
2 tablespoons limoncello

Beat softened butter and cream cheese. Add sugar and mix until light and fluffy. Add eggs, one at a time, mixing well after each. Add the limoncello and beat until well mixed. Sift together flour, baking powder and salt. Alternately add flour and buttermilk to butter mixture. Mix in the lemon juice, lemon zest, and crushed lavender just until combined. Pour into prepared cupcake pans, about 3/4 full and bake at 325 for about 17 minutes. Cool on wire racks.

For curd: Mix lemon juice, lemon zest, and sugar of medium heat until boiling. Whisk egg and egg yolk. Whisk lemon mixture into eggs off the heat (to temper). Add all back to sauce pan and cook over medium heat, whisking constantly, until thickened. Cool completely.

Use a melon baller to scoop a hole into tops of cooled cupcakes. Fill with cooled lemon curd

For buttercream: Beat butter and cream cheese. Add limoncello and beat until smooth. Beat in powdered sugar until desired icing consistency is obtained. Ice filled cupcakes. Garnish with dried lavender.

Now, inhale!

Also, don’t do as we did and forget to add the sugar–one of the most important ingredients! The first batch was the equivalent of lemony, unsweetened cornbread, hah!

Out of the Thistle Blog, Flowery Foodie Goodness.

We hope you enjoyed this bevy of blossom-decorated recipes! Just remember to be sure to verify which flowers are edible and safe to use, and we recommend using only organically grown flowers. Enjoy!

-The Out of the Thistle™ Company

Advertisement

Good cookies.

There’s so much to be thankful for during Christmastime. One thing we are certainly in thanks of: cookies. Cookies are good any time of year. Though, they seem to reign supreme during the holidays for parties and gift-giving. Whether you are going to a cookie swap or just whipping up a batch for some of your favorites, we have a few recipes to recommend. These are a few of the cookie collection from our holiday season:

Linzers, by Thread Bears®A returning favorite: the Linzer cookie. Crisp and light cookies, generously dusted with confectioner’s sugar and filled with strawberry jam. This is the recipe we used.

Easy fudge, by Thread Bears®Though fudge is not cookies, we think it deserves a place in the cookie category. This simple fudge with a sprinkling of sea salt is the perfect addition. This is the recipe we used. Best part: it’s made in the slow cooker!

Cherry shortbread cookies, by Thread Bears®These simple and subtly sweet cookies have the perfect white chocolate to cherry ratio. This is the recipe we used.

Speculaas by Thread Bears®These Speculaas (or Speculoos) are beautiful, but do require the molds to shape them in. If you have the time (and patience!) these cookies are a lovely addition to any cookie tin. These biscuits are crisp with just the right amount of spice. You can find the recipe here.

Palmiers, by Thread Bears®These delicious chocolate palmiers are nutty, chewy, and have such a fun appearance! A friend’s daughter has decided to name these ‘the mustache cookies.’ The recipe can be found here.

chewy molasses cookies, by Thread Bears®A traditional in our cookie repertoire: the chewy molasses. These are the perfect texture and flavor combination. A chewy and spicy inside, a sweet and crunchy exterior. This is the recipe we used.

thumbprints cookies, by Thread Bears®The thumbprint cookie. If done correctly, in our opinion, a thick and chewy base with just the right amount of filling to compliment. We found this recipe, which is going in the favorites. The base has the perfect amount of lemon zest and is the perfect amount of chewy and crisp, while the dark chocolate filling is a perfect accent to the lemon and is sprinkled with just a dash of sea salt. Delicious little morsels.

Gingerpread people by Thread Bears®This recipe was a little tricky. The one solid recommendation we have: freeze and freeze and freeze in-between rolling out and cutting. This dough gets very tacky after handling for a short time, however, the end result is worth it. The gingerbread people are slightly firm on the outside with a chewy and delicious interior.

traditional chocolate chip cookies by Thread Bears®The pinnacle of the cookie tin is the good ol’ chocolate chip. We have tried many, many versions. In our belief, you really can’t get it just right without the shortening. We use mostly organic ingredients and try to stick to eating things that can only be found in nature. However, when it comes to this family favorite, there’s no messing with these. Here’s our recipe:

Chocolate Chip Cookies

Yield: 4 dozen cookies

INGREDIENTS

12 ounces Semi-Sweet Chocolate Chips
2 3/4 – 3 cups unsifted flour
1 teaspoon baking soda
1/2 teaspoon salt
1/2 cup butter, softened
1/2 cup shortening, softened
3/4 cup sugar
3/4 cup brown sugar, packed
2 large eggs
2 teaspoons vanilla

INSTRUCTIONS

Preheat oven to 375ºF.
Whisk flour with baking soda and salt; set aside.
In large mixing bowl, beat butter, shortening and sugars on medium speed until creamy.
Add eggs in, one at a time, then add vanilla. Mix on low speed until incorporated.
Gradually add dry ingredients into butter mixture.
Stir in chocolate chips.
Using a 1 1/4″ cookie scoop, or a rounded tablespoon, drop onto ungreased cookie sheets.
Bake for 9 to 11 minutes or until golden brown on edges. Let cool on cookie sheet for about 5 minutes, then remove and let cool on wire rack completely.

We hope your holiday season is full of good times and good cookies!

Merry Christmas!

-The Thread Bears® Family


Chocolate Zucchini Loaf Cake

My family likes to bake. We also like to eat. Especially things of the chocolate-sorts. And it’s not like pulling teeth to get kids to eat chocolate, either.

I had a small family gathering this weekend and quickly whipped up these delicious, chocolate-y loaf cakes that were a huge hit with the kids–even though they had a secret ingredient: zucchini! And if I can get them to eat their veggies without any arguments or three-hour whiny dinners, well then I’ll take it. So, I’d like to share my favorite zucchini-filled chocolate dessert recipe.

This recipe is great for those of you who have a zucchini bush growing in your backyard and are getting kind of burned out on grilled or baked zucchini. Or, when your grandmother who also has a zuke bush growing manages to bring you over these puppies because they were “hidden in the back and thought you could use them.”

Chocolate Zucchini Loaf Cake by Thread Bears®

Well, thank you Nana. I did use them. I baked eight loaves using these and one from my garden. So, the neighbors and some relatives got to indulge in their own loaf! Side note, the loaves can be frozen, as well!

This recipe is easy to toss together, with the most work being put into grating the zucchini. Piece of cake. But don’t press out any of the water from the zucchini–it helps keep these loaves nice and moist. Make sure that when you are measuring the grated zuke, that you firmly press it into the measuring cup.

Chocolate Zucchini Loaf Cake by Thread Bears®

The zucchini is hardly noticeable, both in color and in taste, and you don’t feel so bad about giving your kids a nice thick slice!

Chocolate Zucchini Loaf Cakes (Makes 2)

2 1/2 cups all-purpose flour
1/2 cup cocoa
1 teaspoon baking soda
1/2 teaspoon baking powder
1 teaspoon salt
1 1/2 cups sugar
3 eggs
1 cup canola oil
2 teaspoons vanilla
2 packed cups grated zucchini (don’t peel it)
1 cup quality semi-sweet chocolate chips

Preheat oven at 350 F. Spray two 9×5 inch pans with nonstick spray.

In a large bowl, stir together flour, cocoa, baking soda, baking powder and salt.

In a medium bowl, beat the sugar and eggs until light and fluffy. Add the oil and vanilla. Add to the dry ingredients along with the zucchini and chocolate chips. Stir just until combined, and divide between the loaf pans.

Bake for 50-60 minutes, or until the tops are cracked and springy to the touch. Begin checking it at about 40 mins. Let cool in the pans on a wire rack for 10 mins. Pull out of pans and cool on the racks completely.

Chocolate Zucchini Loaf Cake by Thread Bears®

Slice it up and enjoy! Rhonda Potteet

Recipe adapted from Babble


No complaints about coziness.

We could gripe about how long this Winter weather has lasted into Spring, but we’re sure you’ve heard it all. Even our Arizona-based family saw a light dusting of snow last week! We would have much rather been outside toiling in the garden instead of shoveling snow or looking out on a greyish-white landscape. However, we used the long, treacherous weather to our advantage.

The effects of  a long Winter gave us more time to grab a hot drink and create a few new goodies from fiber…

mystery-project-by-thread-bears

mystery 2 with a hot brew by Thread Bears®

more opportunity to cozy up with loved ones and (including sassy grandbabies and a new little man in the family!)…

blog1

blog2

more time to find rustic inspirations in the rugged landscape…

duck-boots-in-winter-by-thread-bears

…and more time to indulge in comforting foods.

chocolate-bread-pudding-by-thread-bears

tomato-bisque-with-grilled-chees-croutons-by-thread-bears

apple-frangipane-galette-by-thread-bears

We could play “Guess What We’re Making,” but you’ll just have to check back in a few days to see what will come from those teasers!


Recipe Links: The Apple Frangipane Galette, The Chocolate Bread Pudding (we substituted half the chocolates for fresh blueberries and used whole wheat croissants), Garden Tomato Bisque with Grilled Cheese Croutons.